Frankenstein....one of the most iconic guitars ever.

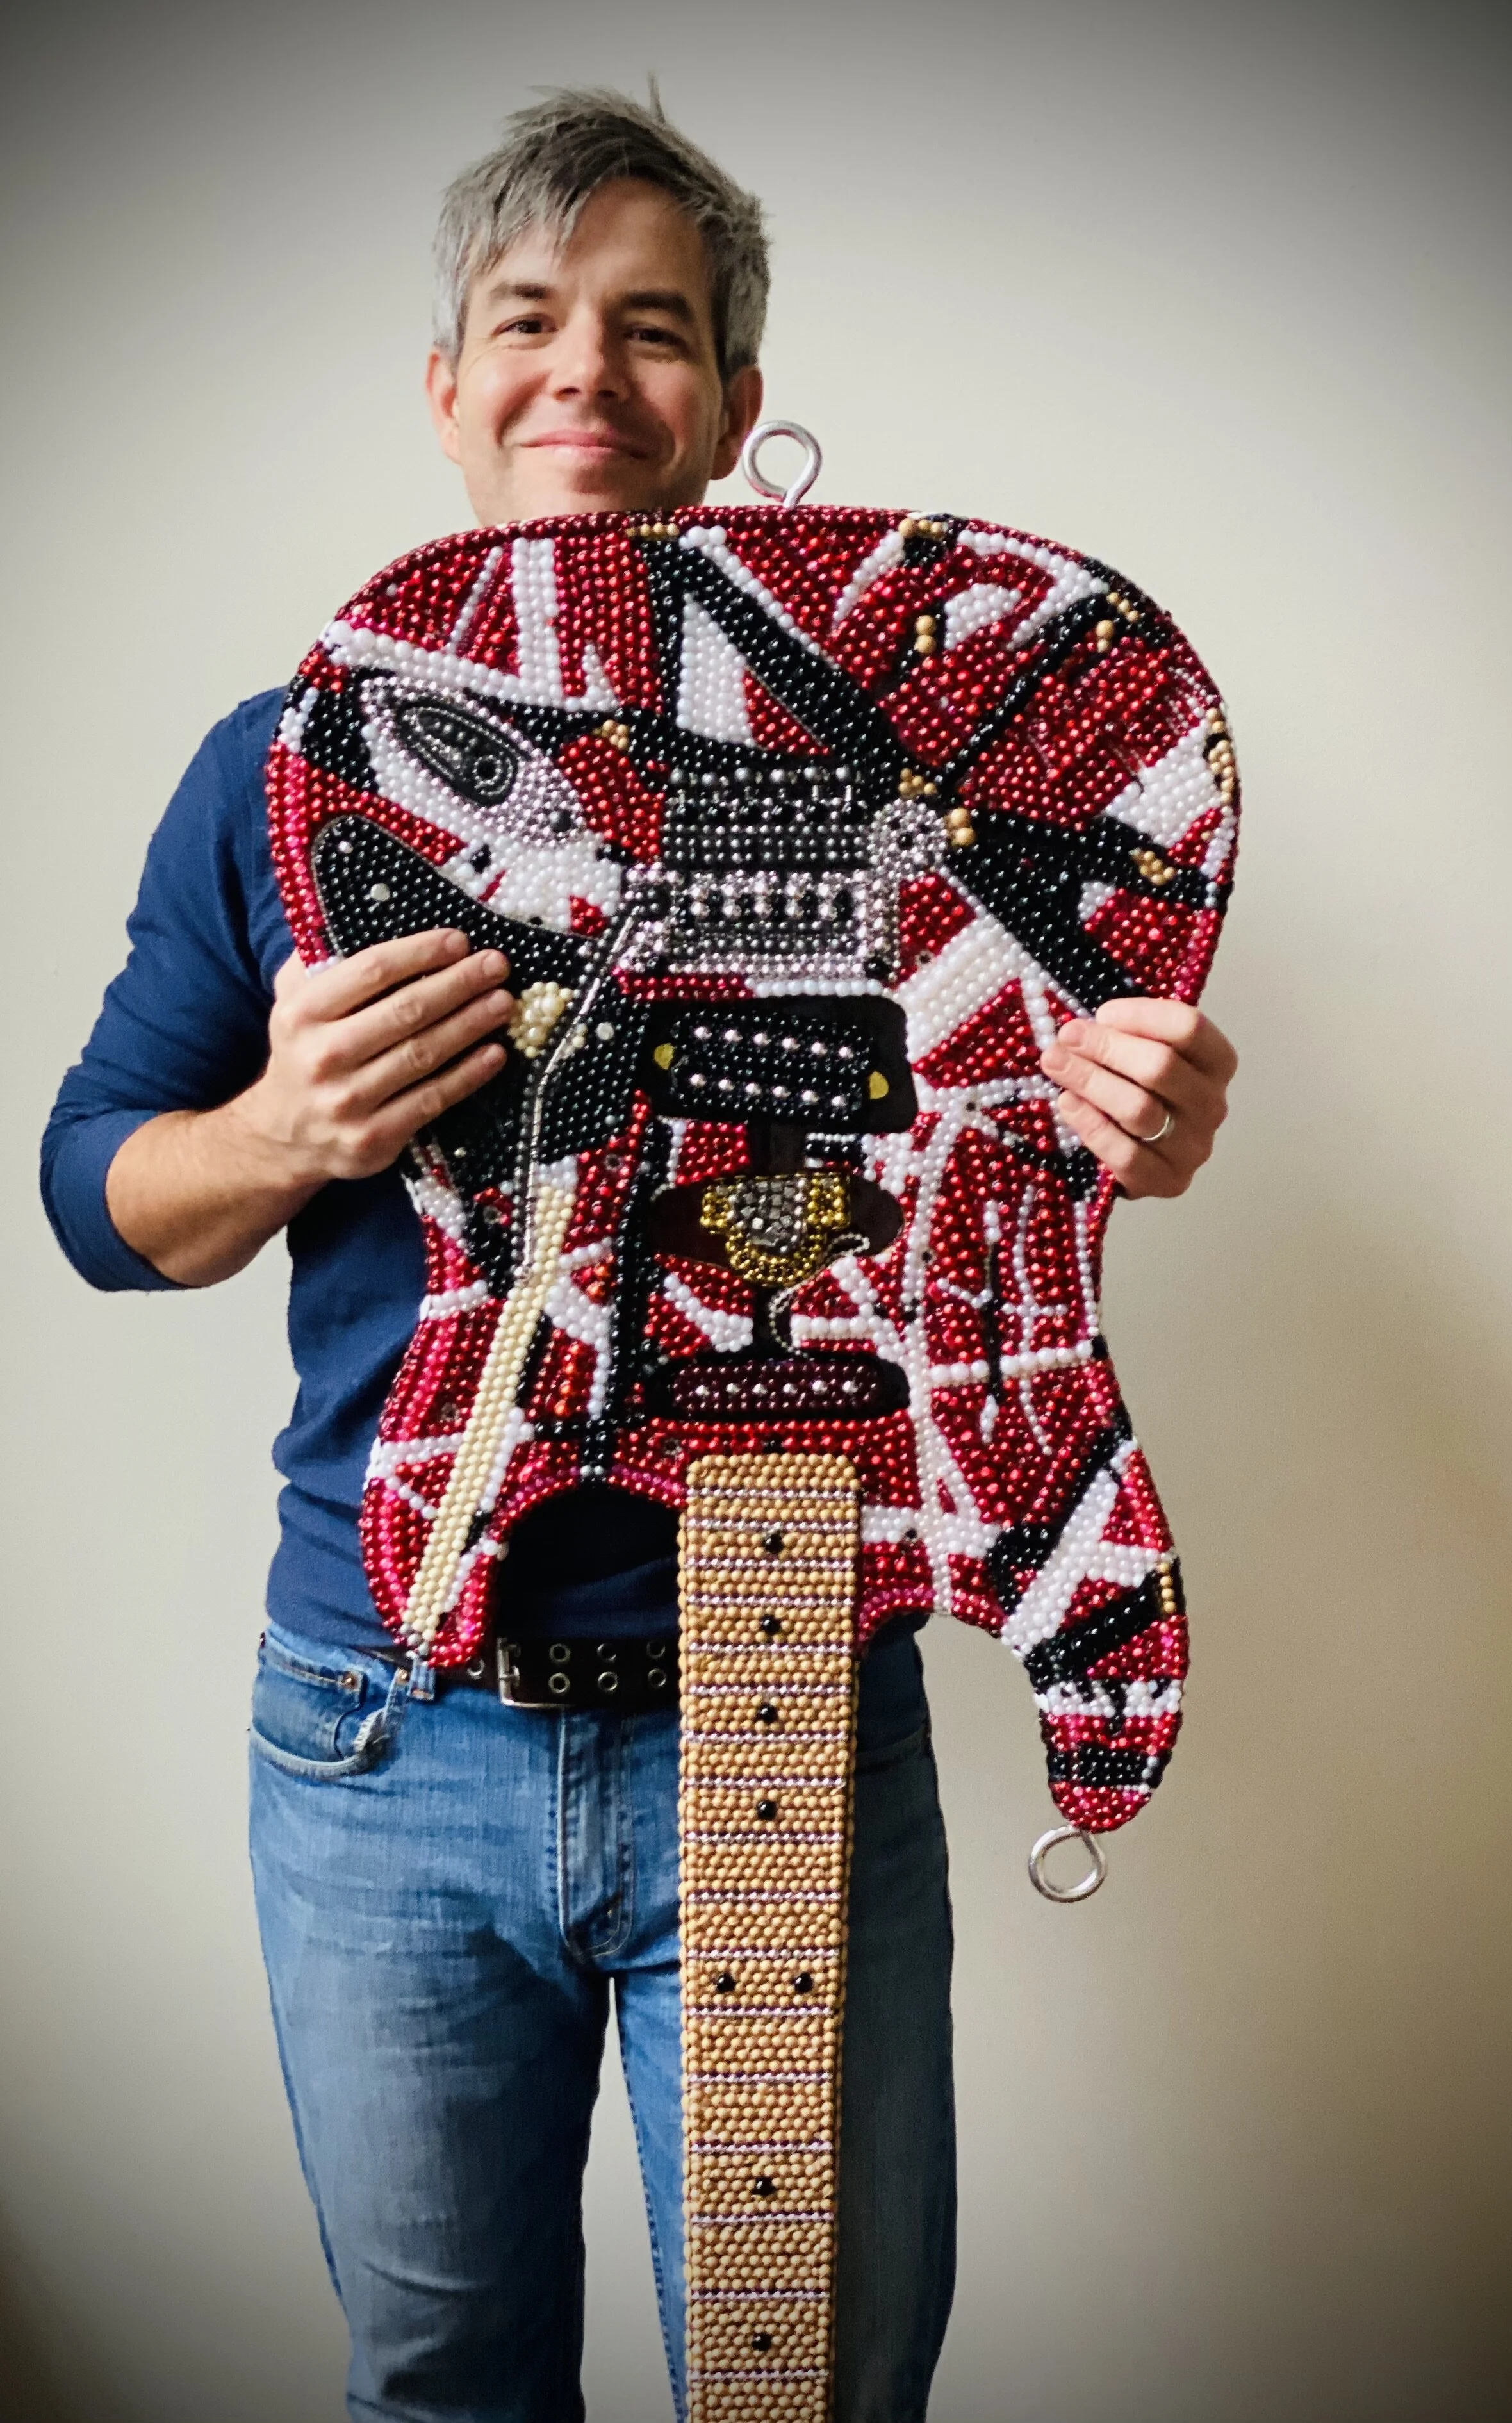
So, shortly after the legendary Eddie Van Halen died last October, I got a request to make a mardi gras beaded version of his iconic Frankenstein guitar…the heavily self-modified and painted strat style guitar that had created the music of my childhood, and inspired generations of guitarists. Awesome. Yes, of course I would love to. And as a guitar fanatic myself…how perfect.

Many years ago…early in my days as a mardi gras bead artist, I came across a photo of an artist in new orleans who’d made a kind of primitive cut-out beaded piece of an electric guitar. I’d always thought that was really cool, and told myself that I would love to do a similar one…I’d even cut out the photo, and it’s sat next to my desk for probably 15 years (but at the moment I can’t find it). But either way, never got around to it. Here was my chance.

As a side note, we’d taken our kids in the spring to NYC 2 years ago, and there just so happened to be an exhibit at the Met called “Play it Loud”…where they displayed the actual original instruments that built Rock n Roll…Elvis’ Martin acoustic, Jimmy Page’s double-neck Gibson, Keith Richard’s tele, Joan Jett’s Melody Maker, Jimi Hendrix’s Flying V, Bruce Springsteen;s telecaster…and Eddie’s Frankenstein strat. There. In person. The ACTUAL guitar. It was a stunning, unbelievable experience.

SO….needless to say, I was excited.

I was given a specific instruction. It had to be 60” long. All the other dimensions I had to figure out myself. And honestly, the toughest part is getting the proportions to look correct. So I looked at tons of pictures of his guitar (including the ones I took at the Met), and measured my own ‘74 stratocaster…

IMG_0085.jpg

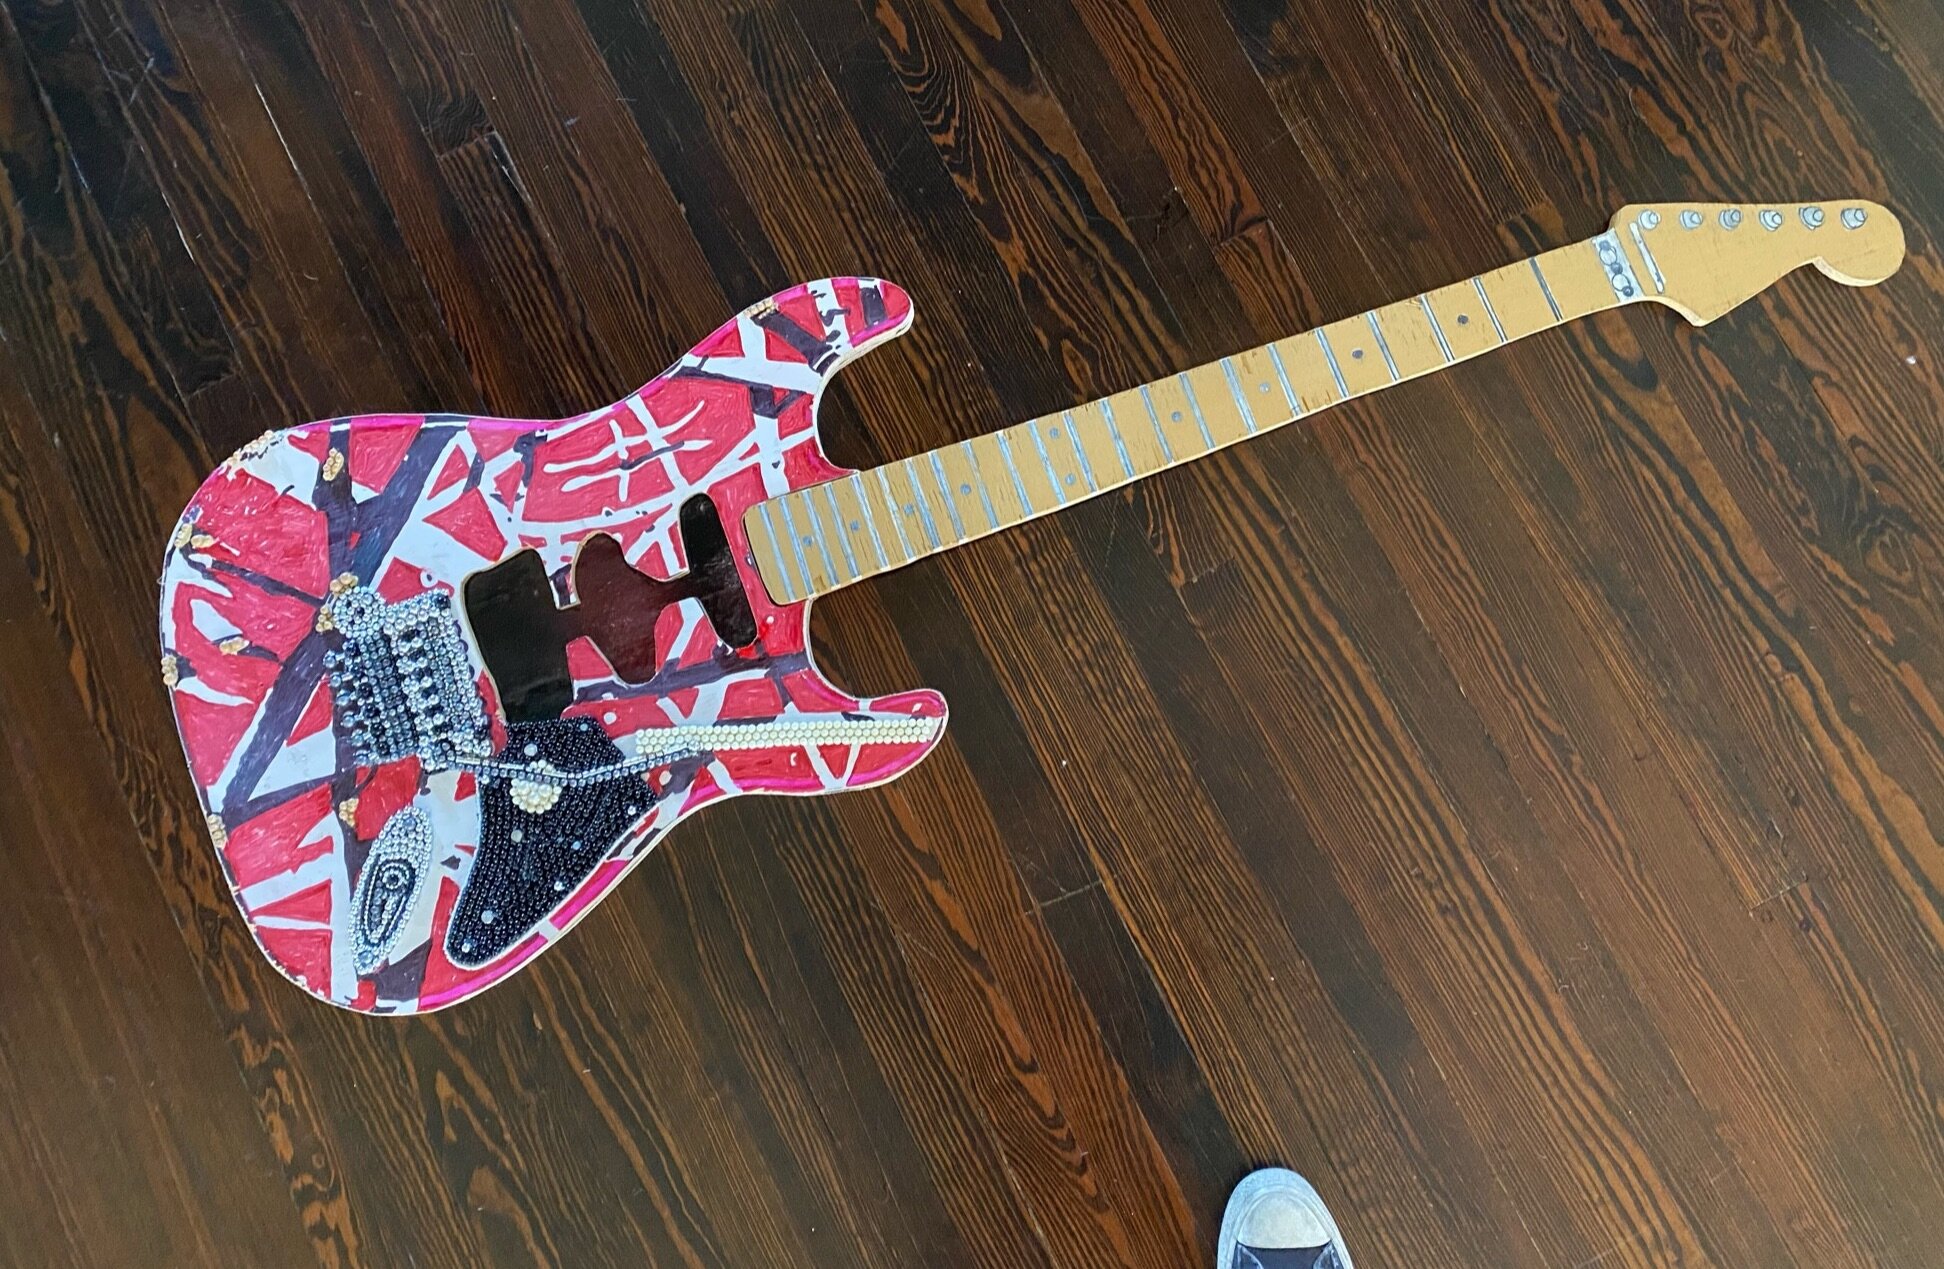
But one interesting thing about Eddie’s guitar is that there were a lot of little details…his modifications..that made it what it is. One unique aspect, I thought, was that he took all three pickups out, and replaced them, routing out the bridge for a bigger humbucker. As a guitar-lover, I felt that was important so it influenced my design of the piece. I sketched out the guitar body (at 1.55 scale for those of you who care), and then cut out the pickup cavities..careful to get every edge and irregularity correct. Then I cut out a second guitar body and glued it underneath the first…


IMG_3490 copy.png
IMG_3486.jpeg
IMG_3489.jpeg

Knowing I wanted to lucite-coat the guitar to make it glossy, I had to think about how I was going to coat it. As I’ve mentioned in a previous post, lucite is an epoxy that I mix and then pour over and work into a piece that when dried gives a hard, glassy appearance. BUT, it will go everywhere….and how will I keep it from just filling up the pickup cavities?

So I decided to build each of the PICKUPS first from separate pieces of wood (and beads), and lucite coat them individually. Then I carefully coated the pickup cavities with a super thin brushed-on layer of lucite. Then eventually, after everything was finished, glued the pickups into the cavities.

Still, it was a little nerve-wracking that if I tried to coat the whole piece at once, all of the liquid lucite would run into the cavities and fill them up with lucite. Might be cool…but still it’s not what I wanted. So, when I was done with the beading, I carefully coated a few layers of beads around the pickup cavities and let them dry (to create a kind of barrier around the cavities). Then I came back a few days later and coated the rest of the piece.

Thank god it worked.

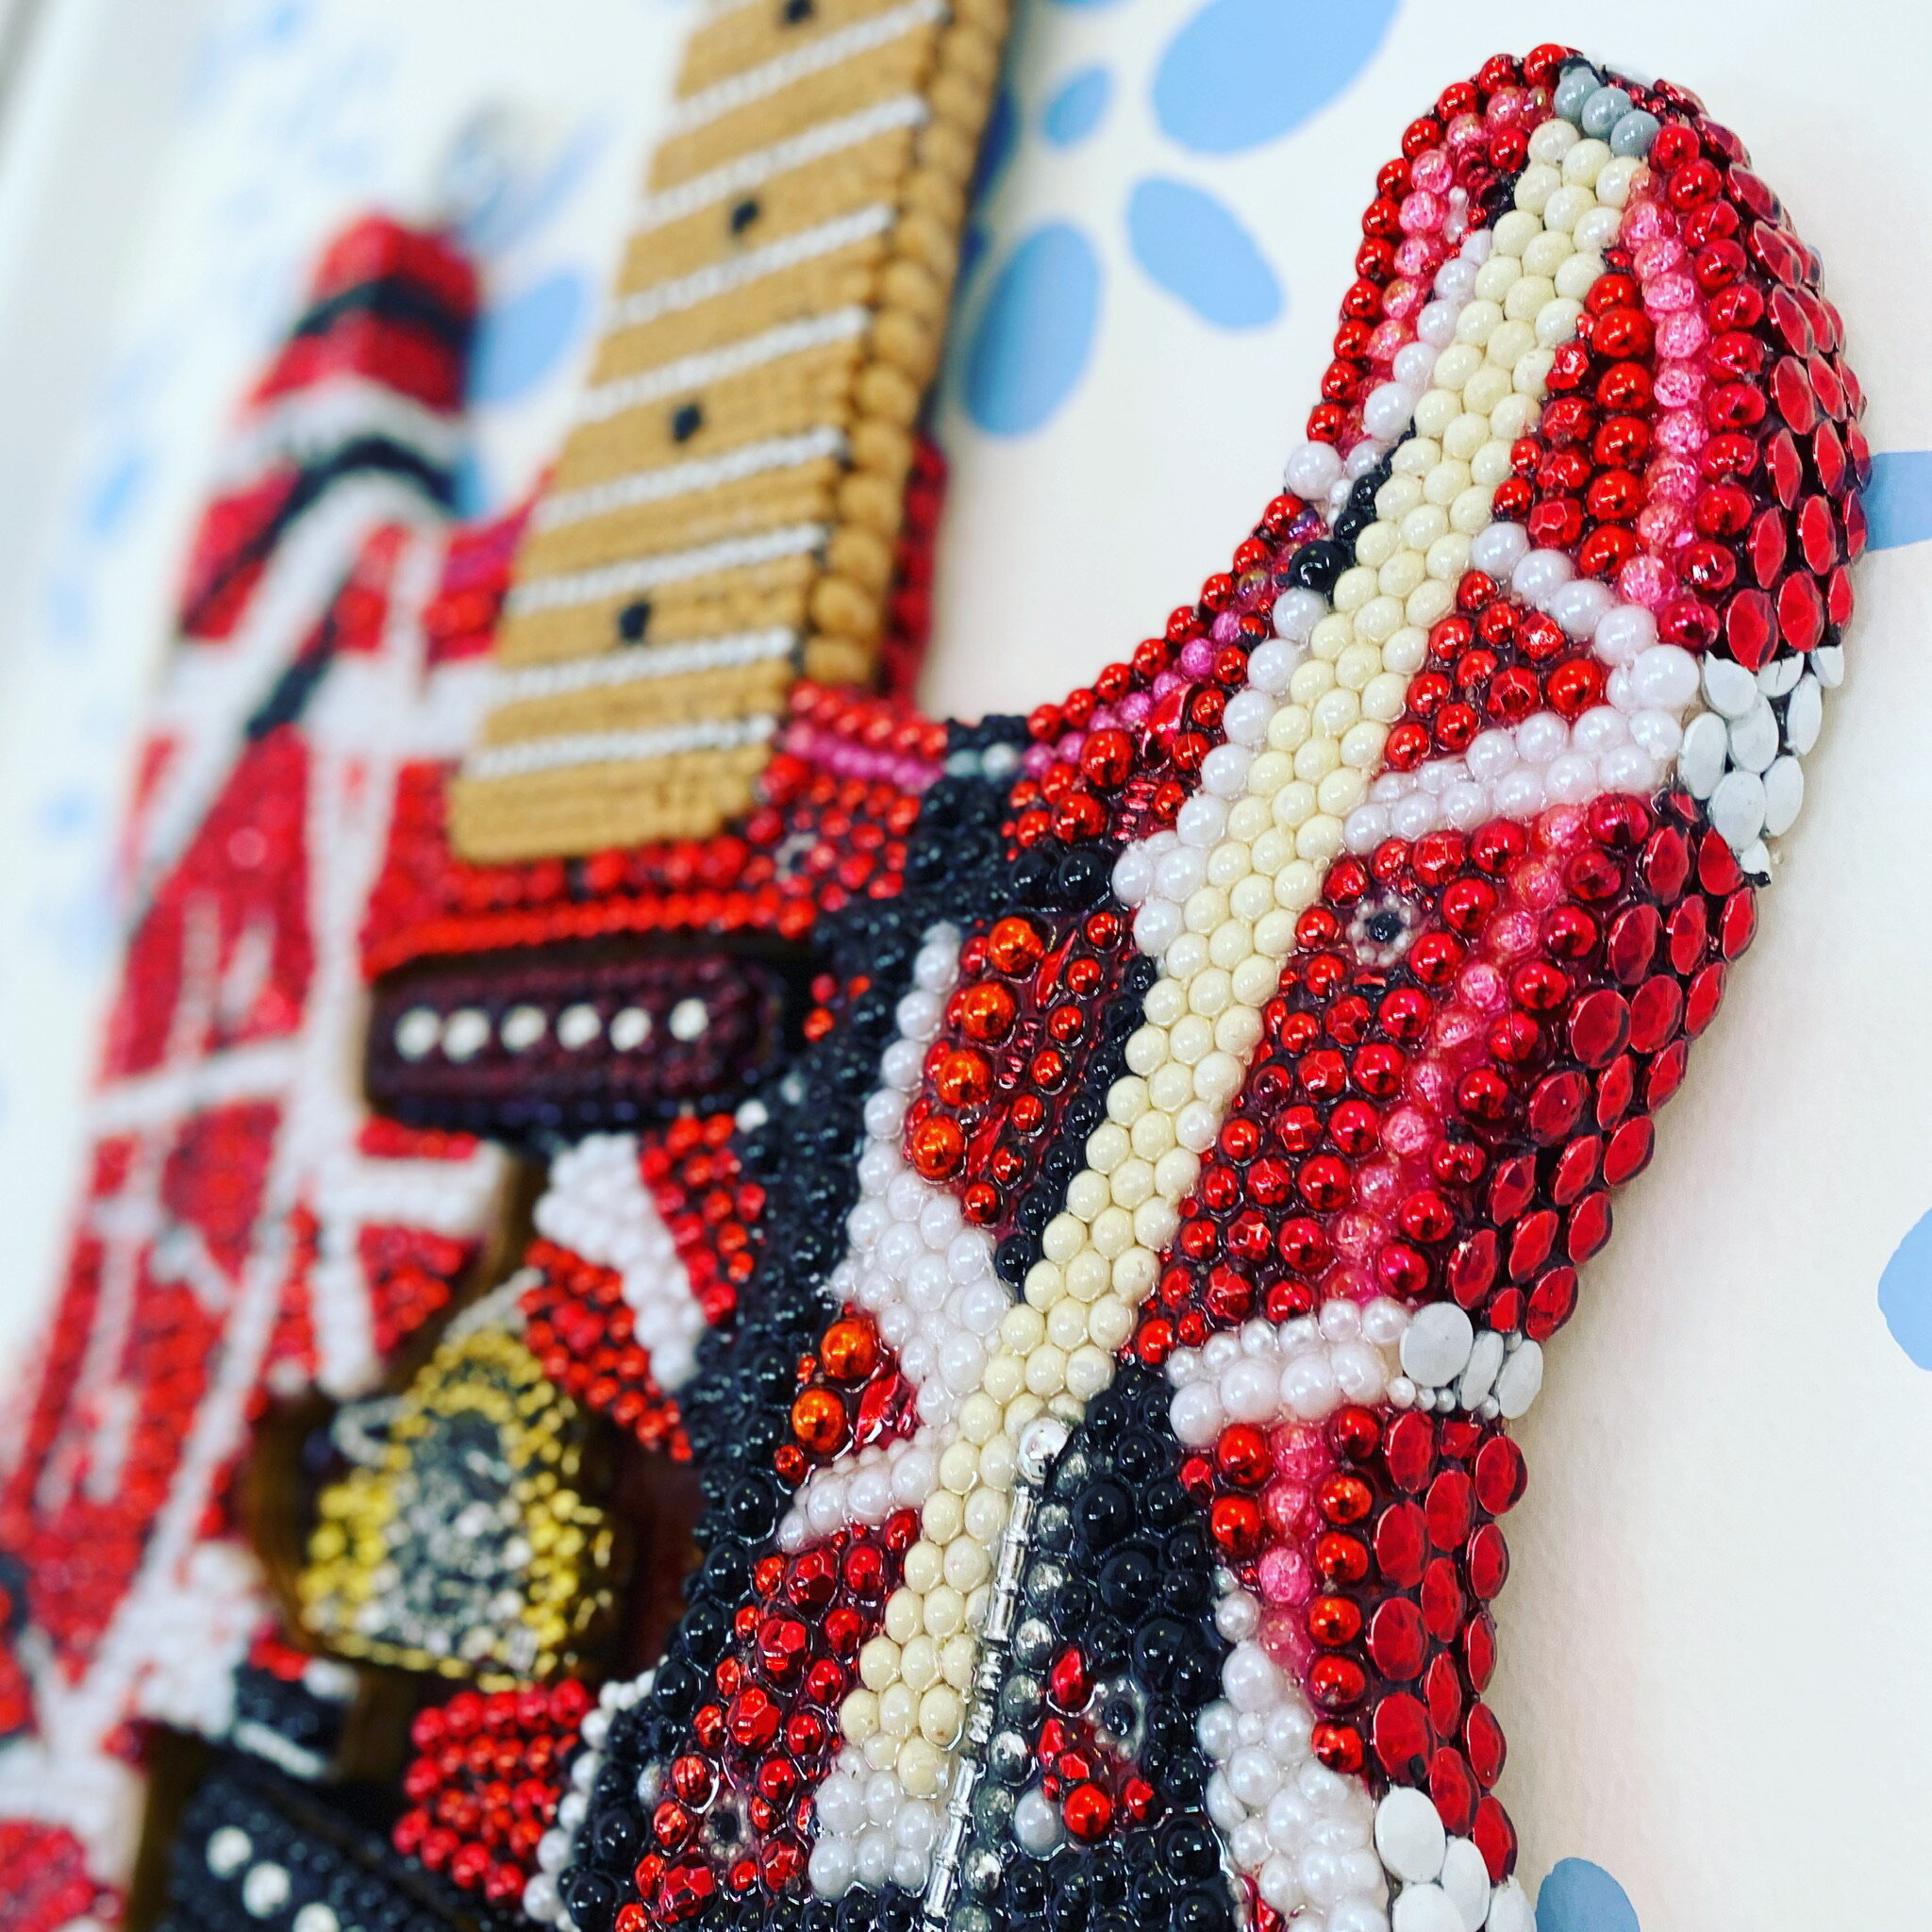
I’ve always been kind of a realist at heart, and really fixated on making whatever I’m making look accurate and “real”….which has held over into my artsy endeavors these days too…despite working in one of the most unrealistic mediums ever. Beads.

So I spent a lot of time trying to replicate every little detail of Eddie’s guitar…down to each exact stripe and screw, every little ding where the wood showed through, the strip of tape where he stuck his extra picks, and even to the cigarette burn on the headstock.


And….as one final little detail, true to the original, I drilled out and inserted eye-bolts on the upper horn and the butt of the guitar, where he would have clipped on his guitar strap before walking out on stage…

(And for those who care - those too are the correct proportions…1.55 scale. ;) )

I’d like to think Eddie would be proud. Long live rock n’ roll.

A unique graduation request...

So around this time last year I got an interesting…and kind of unusual…request…

A soon-to-be graduating senior at Tulane asked if I could decorate the mortar boards for her and her friend for graduation. I thought about it…and always intrigued by unusual projects, I thought ‘sure, what the hell’!

So she sent me the mortar boards and I got to work.

Couldn’t glue directly on the fabric, which would probably be a mess…and definitely couldn’t lucite coat directly on the fabric, which would definitely be a disastrous mess…

So I cut out two templates from thin hard plastic sheeting to match the top of each mortar board (with a hole in the middle for the button) and set to work beading a fleur de lis on each and then finished each in lucite.

Finally, glued each template to the top of each mortal board, and capped each button with a half-bead.

Then packed them and shipped them back to New Orleans….just in time for graduation!

Pretty cool idea for a NOLA graduation (even if they ended up kind of heavy…).

fleur caps.jpg
fleur caps 2.jpg
tulane girls.png


A piece designed by...the imaginations of first graders!

So I guess it was a couple of months ago when I was approached with the request to take on a class project with my daughter’s first grade class. The subject could be whatever I wanted, and the medium was totally up to me…which of course, would be beads. I mean…what else…?

In addition to innumerable other items, treasures, luxurious getaways, and standard auction items like that, each class at Forsyth undertakes a “class project”…which is to varying (like…widely varying) degrees contributed to by the students…to be auctioned off at the annual spring school auction.

OK. Hmmm. So what could I do, and how could I get the kids actually involved…?

After a bit of pondering, I decided to have each kiddo draw an imaginary creature, however fantastical crazy colorful and wacky they wanted…and I would translate them each into beads and insert them into an imaginary landscape, where they would be frolicking, swimming, flying, or just hanging out.

Little did I realize how much color and intricacies their little minds could envision. Most of which had unicorn horns and wings. Of course.

And there would be 37 different creatures to create.

This would take some time. Like….a ton of time.

But in the end, it turned out beautifully. A fun way to capture a little insight into the first grader’s imagination…

rob-corley-forsyth.jpg
forsyth1.jpg
forsyth2jpg.jpg
forsyth3.jpg
forsyth4.jpg
forsyth5.jpg
forsyth6.jpg
forsyth7.jpg
forsyth9.jpg
forsyth10.jpg
forsyth11.jpg
forsyth12.jpg
forsyth14.jpg
forsyth15.jpg
forsyth16.jpg
IMG_0712.jpg

All with a little guide on the back…to give credit to the little visionaries…

;)

kind of more of an engineering project than bead art...

So earlier in the summer I was posed with a pretty challenging project...

A lovely couple wanted a rendition of a cork, from the bottle of wine on the day they were engaged, to hang on the wall of their wine cellar. 

But I thought that a plain old flat piece wouldn't capture the essence of being a cork...more of just a rectangle...

So we decided to make it more of a 3-D piece. The first of such I have ever tried to create.

So after pondering a bit, I bought some stainless steel ductwork, long L-brackets, and wood for the base, and built a half-cork. Then I carefully measured and cut some semi-circular wood end pieces, and fit them into the ends of it. Almost complete...

But I was a little afraid that it might be kind of flimsy and prone to denting...which would not look very cork-like...

So I cut  a little hole in one end piece and squirted in foam filler to fill up the entire piece...which made it nice and solid. 

Then I set about my usual beading...

I think it turned out pretty awesomely...


Where do they go....?

I really love seeing where my pieces end up. 

Whether someone gives one as a surprise or a gift, or whether it was planned for a specific spot in a specific room....it's always great fun for me to see where they end up...

Here are a few of my favorites: 

Random bits and pieces

For a variety of nonspecific reasons, not every piece that I do ends up on my portfolio page. But I do love each of them for their unique details, and for the people who came up with the ideas...

So here is a collection of a handful of some of my pieces not on the portfolio page:

rob-corley-volleyball-small.jpg


OH Valentines!

So...about a year or so ago, one of my favorite crazy artists Ashley Longshore posted a valentines 'challenge' of sorts to all of her 30,000 or so Instagram followers.....to create their best coolest most unique valentines and send them to her...and she'd choose her favorites and send them a valentines of her own...

So of course I had to take part in this little event!

I decided to do a take on the classic little chalky candy hearts we all know and love...

And if you are at all familiar with Ashley's ebullient personality and wild sense of humor..or happen to come across her nearly continuous flood of crazy instagram posts ...you'll understand the subject of my valentines.

so i made a little heart-shaped box...and packed them up....

so i made a little heart-shaped box...and packed them up....

and sent them to New Orleans just before Valentines Day...

and sent them to New Orleans just before Valentines Day...

So....I think she liked them. 

even hinted that she was pleased with my entry on my instagram page...

They are pretty cool I must say. But...not really something you can just hang up anywhere....

As for a valentine from Miss Ashley....Well...still waiting....

COORS LIGHT Mardi Gras 2016 Advertising Campaign!!

So back in mid-summer I got an unexpected call from an advertising agency in Denver. They told me that their client MillerCoors was interested in commissioning me to do a piece for their advertising campaign for Mardi Gras 2016....!!! How unbelievably awesome!!

So after a confidentiality agreement and several proposals, we settled on a plan and I got the green light from SAB Miller. A 40 x 40" piece that would be translated into billboards, flyers, and posters in the Southeastern US....during the 2016 Mardi Gras season. 

Again on a pretty short timeframe (which seems to be a developing trend for me...), it came together beautifully and was shipped off to Denver..

One of my favorite southern clients spotted one such poster in Mobile, Alabama in December....

Keep your eyes out for one!


blakely and tommy!

blakely and tommy!


Ozzie - a few more details...

So when I was asked to do a portrait of vintage Cardinals legend Ozzie Smith, I had my usual misgivings about how I was going to translate this photo of a dude into mardi gras beads...with at least some semblance of realism...

But fortunately I was able to get a little graphic design help from my trusty pal Cheree, who crucially modified the photo into a more "beadable" image...and then I took it from there....

Here are a few of my favorite close ups..


Wait! I'm being followed on Instagram by....!!!!

Yes, I too am on Instagram...though not as avidly as my lovely wife or most of the other people I know. I'm kind of lazy about these kinds of things...

BUT, a few days ago I happened to check it...and among a smattering of a few new followers, was one new follower in particular..:

Only one of my favorite artists of all time!!! James Michalopoulos. 

He is one of the most renowned of contemporary New Orleans artists...one whose style, textures, colors, and subjects have always entranced me...

http://www.michalopoulos.com

And also the owner of Celebration Distillery...which incidentally makes my favorite Old New Orleans Rum!

I am stunningly flattered that he liked my art and started following me.....


Just for fun, here's his gorgeous original painting on which I based my michalopoulos-bead-interpretation:

So awesome...

ICE...

ICE. 

So how in the world am I going to make mardi gras beads look like ice..?

And how do I make it look like there's a little bourbon peeking through under the edges....?

Those were some of the things I'd never done before and I had to ponder a bit (and stress out about a little) while I was working on my recent mint julep piece....

So I tried painting a few parts of the underlying plywood with a metallic brown paint, then overlaid a huge array of clear beads on top..some sparkly, some opaque, some clear, and all different sizes. The brown showed through just enough at the edges. Then, to give it a kind of 3D 'ice' appearance, I layered extra layers of beads on top of certain patches of the first layer...and....

I think it turned out pretty icy!

At least for mardi gras beads.....

;)

So how long does it take...?

Honestly as ridiculous as it sounds, I have no idea. 

After all the years I've been making these things, I've never really clocked any of them. Those of you who know me know how hectic my days can be with everything else join on. Usually, you know, I work on a piece a little here...a little there...a couple hours one day...an hour or so the next...until whoa! it's done. 

So when I sat down to start working on Humphrey and Marilyn (under a pretty tight timeframe I might note), it dawned on me that it would be kind of fun...and maybe a little enlightening....to keep track of just exactly how long they took me to finish. 

From blank plywood to finished portrait...

The final tally??

Humphrey was 10h, 30min.....

Marilyn took 14h, 45min.

So there you go. That's how long. 

Letters!@!

I'm not sure how exactly this idea started, but somewhere along the line i decided that it would be fun to deviate from the mardi gras bead portraits and make letters...jigsaw-cut letters...

I think the first ones were for my little girl Marie and her almost-twin and best friend Biz for their 3rd birthdays.

The little chicks loved them, and pretty soon these letters became some of my most requested commissions...and so my love for my jigsaw blossomed...

Here are a few of the many so far...and many more on order...

julia and her J

julia and her J

Hen loved Marie's M so much that he requested an H for his room...in his favorite color gold...

Hen loved Marie's M so much that he requested an H for his room...in his favorite color gold...

A little mid-project modification for Bazaarvoice..

So I was commissioned to do a fairly big piece for this Austin TX-based company Bazaarvoice, which was pretty cool...no idea how they found me...

Basically, a big version of their logo in beads. No prob. Pretty quick deadline...no prob.

But....after I'd finished the logo and was getting started on the background, I got a call that they really wanted to incorporate a fleur-de-lis...since this was for a new-orleans-themed gala...

After a few ideas back and forth, they decided that they wanted the two circles to be changed to fleur de lis'. I had a few misgivings about getting relatively little fleurs to turn out looking good, but...ok. So I chiseled up the circles I'd made (yes this hard-core glue I use has to be chiseled off)... 

But in the end I think it turned out pretty damn righteous. Lucite-coated for extra sparkle!

I think I kind of like it better this way...

a few sports logos

one thing that I always think turns out pretty well in beads is a logo..sports logo, team logo, whatever...

There've been a bunch, and they're pretty straightforward, and really vibrant...

Here are a few

rob-corley-stl
rob-corley-blues
rob-corley-orioles
rob-corley-brewers
rob-corley-cubs
rob-corley-cardinals